Unity Comment créer des commandes tactiles mobiles
Les commandes sont l'une des parties les plus importantes d'un jeu vidéo, et sans surprise, c'est ce qui permet aux joueurs d'interagir avec le monde du jeu.
Les commandes de jeu sont des signaux envoyés via une interaction matérielle (souris/clavier, manette, écran tactile, etc.) qui sont ensuite traités par le code du jeu, appliquant certaines actions.
Les PC et Les consoles de jeux ont des boutons physiques sur lesquels on peut appuyer. Cependant, les appareils mobiles modernes n'ont que quelques boutons physiques, le reste de l'interaction se fait via gestes tactiles, ce qui signifie que les boutons de jeu doivent être affichés à l'écran. C'est pourquoi lors de la création d'un jeu mobile, il est important de trouver un équilibre entre avoir tous les boutons sur l'écran tout en le gardant convivial et sans encombrement.
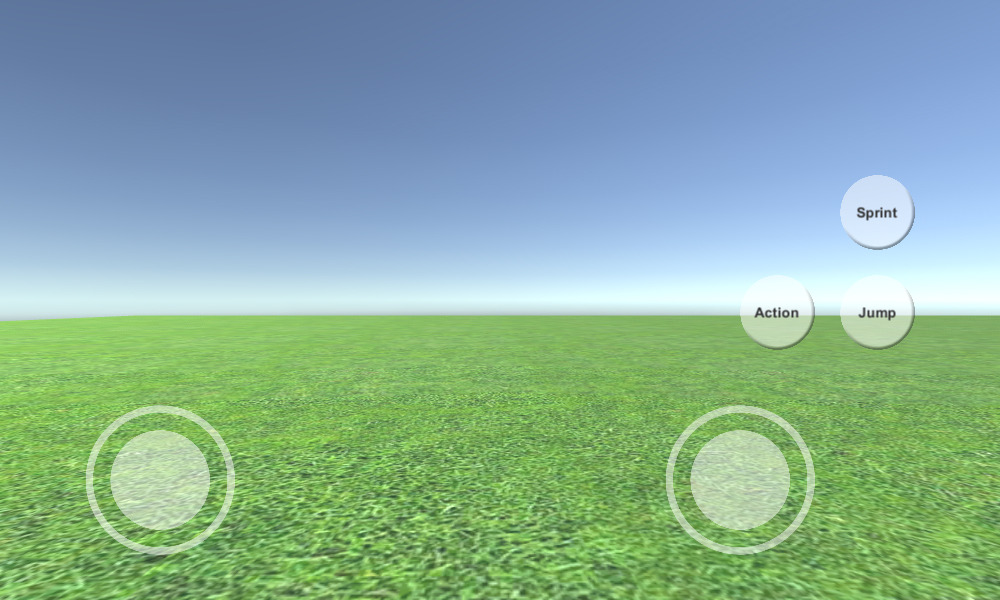
Dans ce didacticiel, je vais montrer comment créer des contrôles mobiles complets (Joysticks et boutons) dans Unity à l'aide de UI Canvas.
Étape 1: Créez tous les scripts nécessaires
Ce didacticiel comprend 2 scripts, SC_ClickTracker.cs et SC_MobileControls.cs. Le premier script écoutera les événements de clic et le deuxième script lira les valeurs générées à partir des événements.
SC_ClickTracker.cs
using System.Collections;
using System.Collections.Generic;
using UnityEngine;
using UnityEngine.EventSystems;

#if UNITY_EDITOR
using UnityEditor;
#endif

public class SC_ClickTracker : MonoBehaviour, IPointerDownHandler, IDragHandler, IPointerUpHandler
{
    public string buttonName = ""; //This should be an unique name of the button
    public bool isJoystick = false;
    public float movementLimit = 1; //How far the joystick can be moved (n x Joystick Width)
    public float movementThreshold = 0.1f; //Minimum distance (n x Joystick Width) that the Joystick need to be moved to trigger inputAxis (Must be less than movementLimit)

    //Reference variables
    RectTransform rt;
    Vector3 startPos;
    Vector2 clickPos;

    //Input variables
    Vector2 inputAxis = Vector2.zero;
    bool holding = false;
    bool clicked = false;

    void Start()
    {
        //Add this button to the list
        SC_MobileControls.instance.AddButton(this);

        rt = GetComponent<RectTransform>();
        startPos = rt.anchoredPosition3D;
    }

    //Do this when the mouse is clicked over the selectable object this script is attached to.
    public void OnPointerDown(PointerEventData eventData)
    {
        //Debug.Log(this.gameObject.name + " Was Clicked.");

        holding = true;

        if (!isJoystick)
        {
            clicked = true;
            StartCoroutine(StopClickEvent());
        }
        else
        {
            //Initialize Joystick movement
            clickPos = eventData.pressPosition;
        }
    }

    WaitForEndOfFrame waitForEndOfFrame = new WaitForEndOfFrame();

    //Wait for next update then release the click event
    IEnumerator StopClickEvent()
    {
        yield return waitForEndOfFrame;

        clicked = false;
    }

    //Joystick movement
    public void OnDrag(PointerEventData eventData)
    {
        //Debug.Log(this.gameObject.name + " The element is being dragged");

        if (isJoystick)
        {
            Vector3 movementVector = Vector3.ClampMagnitude((eventData.position - clickPos) / SC_MobileControls.instance.canvas.scaleFactor, (rt.sizeDelta.x * movementLimit) + (rt.sizeDelta.x * movementThreshold));
            Vector3 movePos = startPos + movementVector;
            rt.anchoredPosition = movePos;

            //Update inputAxis
            float inputX = 0;
            float inputY = 0;
            if (Mathf.Abs(movementVector.x) > rt.sizeDelta.x * movementThreshold)
            {
                inputX = (movementVector.x - (rt.sizeDelta.x * movementThreshold * (movementVector.x > 0 ? 1 : -1))) / (rt.sizeDelta.x * movementLimit);
            }
            if (Mathf.Abs(movementVector.y) > rt.sizeDelta.x * movementThreshold)
            {
                inputY = (movementVector.y - (rt.sizeDelta.x * movementThreshold * (movementVector.y > 0 ? 1 : -1))) / (rt.sizeDelta.x * movementLimit);
            }
            inputAxis = new Vector2(inputX, inputY);
        }
    }

    //Do this when the mouse click on this selectable UI object is released.
    public void OnPointerUp(PointerEventData eventData)
    {
        //Debug.Log(this.gameObject.name + " The mouse click was released");

        holding = false;

        if (isJoystick)
        {
            //Reset Joystick position
            rt.anchoredPosition = startPos;
            inputAxis = Vector2.zero;
        }
    }

    public Vector2 GetInputAxis()
    {
        return inputAxis;
    }

    public bool GetClickedStatus()
    {
        return clicked;
    }

    public bool GetHoldStatus()
    {
        return holding;
    }
}

#if UNITY_EDITOR
//Custom Editor
[CustomEditor(typeof(SC_ClickTracker))]
public class SC_ClickTracker_Editor : Editor
{
    public override void OnInspectorGUI()
    {
        SC_ClickTracker script = (SC_ClickTracker)target;

        script.buttonName = EditorGUILayout.TextField("Button Name", script.buttonName);
        script.isJoystick = EditorGUILayout.Toggle("Is Joystick", script.isJoystick);
        if (script.isJoystick)
        {
            script.movementLimit = EditorGUILayout.FloatField("Movement Limit", script.movementLimit);
            script.movementThreshold = EditorGUILayout.FloatField("Movement Threshold", script.movementThreshold);
        }
    }
}
#endif
SC_MobileControls.cs
using System.Collections;
using System.Collections.Generic;
using UnityEngine;

public class SC_MobileControls : MonoBehaviour
{
    [HideInInspector]
    public Canvas canvas;
    List<SC_ClickTracker> buttons = new List<SC_ClickTracker>();

    public static SC_MobileControls instance;

    void Awake()
    {
        //Assign this script to static variable, so it can be accessed from other scripts. Make sure there is only one SC_MobileControls in the Scene.
        instance = this;

        canvas = GetComponent<Canvas>();
    }

    public int AddButton(SC_ClickTracker button)
    {
        buttons.Add(button);

        return buttons.Count - 1;
    }

    public Vector2 GetJoystick(string joystickName)
    {
        for(int i = 0; i < buttons.Count; i++)
        {
            if(buttons[i].buttonName == joystickName)
            {
                return buttons[i].GetInputAxis();
            }
        }

        Debug.LogError("Joystick with a name '" + joystickName + "' not found. Make sure SC_ClickTracker is assigned to the button and the name is matching.");

        return Vector2.zero;
    }

    public bool GetMobileButton(string buttonName)
    {
        for (int i = 0; i < buttons.Count; i++)
        {
            if (buttons[i].buttonName == buttonName)
            {
                return buttons[i].GetHoldStatus();
            }
        }

        Debug.LogError("Button with a name '" + buttonName + "' not found. Make sure SC_ClickTracker is assigned to the button and the name is matching.");

        return false;
    }

    public bool GetMobileButtonDown(string buttonName)
    {
        for (int i = 0; i < buttons.Count; i++)
        {
            if (buttons[i].buttonName == buttonName)
            {
                return buttons[i].GetClickedStatus();
            }
        }

        Debug.LogError("Button with a name '" + buttonName + "' not found. Make sure SC_ClickTracker is assigned to the button and the name is matching.");

        return false;
    }
}
Étape 2: configurer les contrôles mobiles
- Créez un nouveau canevas (GameObject -> UI -> Canvas)
- Remplacez 'UI Scale Mode' dans Canvas Scaler par 'Scale With Screen Size' et remplacez la résolution de référence par celle avec laquelle vous travaillez (dans mon cas, c'est 1000 x 600)
- Attachez le script SC_MobileControls à l'objet Canvas
- Faites un clic droit sur Objet Canvas -> UI -> Image
- Renommez l'image nouvellement créée en "JoystickLeft"
- Remplacez "JoystickLeft" Sprite par un cercle vide (n'oubliez pas de changer le type de texture en 'Sprite (2D and UI)' après l'avoir importé dans Unity)

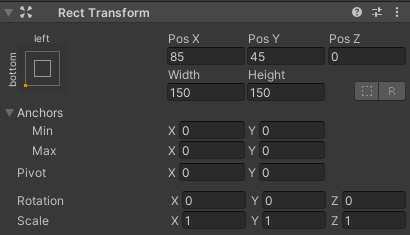
- Définissez les valeurs "JoystickLeft" Rect Transform de la même manière que dans la capture d'écran ci-dessous:
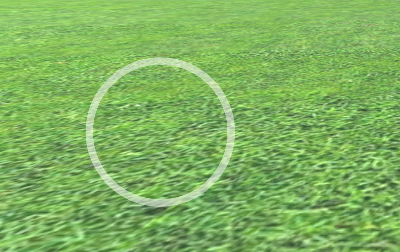
- Dans le composant Image, définissez la couleur alpha sur 0,5 pour rendre le sprite légèrement transparent:
- Dupliquez l'objet "JoystickLeft" et renommez-le en "JoystickLeftButton"
- Déplacez "JoystickLeftButton" à l'intérieur de l'objet "JoystickLeft"
- Remplacez le Sprite "JoystickLeftButton" par un cercle rempli:

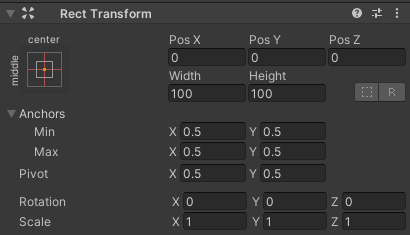
- Définissez les valeurs "JoystickLeftButton" Rect Transform de la même manière que dans la capture d'écran ci-dessous:
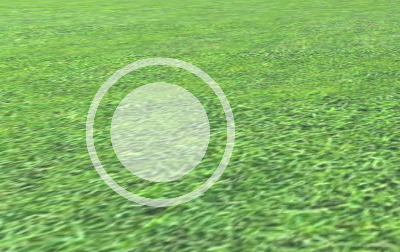
- Ajouter un composant Button à "JoystickLeftButton"
- Dans le composant Button, remplacez Transition par 'None'
- Attachez le script SC_ClickTracker à "JoystickLeftButton"
- Dans SC_ClickTracker, définissez le nom du bouton sur n'importe quel nom unique (dans mon cas, je l'ai défini sur 'JoystickLeft') et cochez la case 'Is Joystick'.

Le bouton du joystick est prêt. Vous pouvez avoir n'importe quel nombre de joysticks (dans mon cas j'en aurai 2, un à gauche pour contrôler le mouvement et un à droite pour contrôler la rotation).
- Dupliquez "JoystickLeft" et renommez-le en "JoystickRight"
- Développez "JoystickRight" et renommez "JoystickLeftButton" en "JoystickRightButton"
- Définissez les valeurs "JoystickRight" Rect Transform de la même manière que dans la capture d'écran ci-dessous:
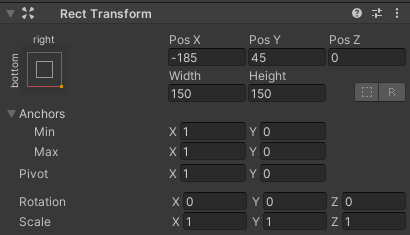
- Sélectionnez l'objet "JoystickRightButton" et dans SC_ClickTracker, remplacez le nom du bouton par 'JoystickRight'
Le deuxième Joystick est prêt.
Créons maintenant un bouton normal:
- Faites un clic droit sur Objet Canvas -> UI -> Bouton
- Renommer l'objet bouton en "SprintButton"
- Changez le Sprite "SprintButton" en Cercle avec un effet de biseau:

- Définissez les valeurs "SprintButton" Rect Transform de la même manière que dans la capture d'écran ci-dessous:
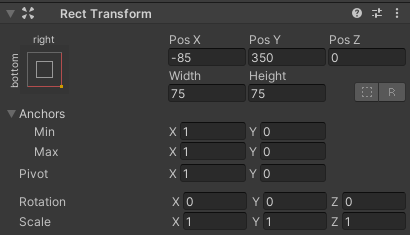
- Changez la couleur alpha de l'image "SprintButton" en 0,5.
- Attachez le script SC_ClickTracker à l'objet "SprintButton"
- Dans SC_ClickTracker, changez le nom du bouton en 'Sprinting'
- Sélectionnez l'objet texte à l'intérieur de "SprintButton" et changez son texte en 'Sprint', changez également la taille de la police en 'Bold'
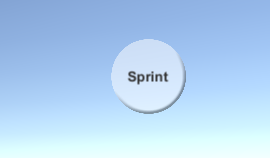
Le bouton est prêt.
Nous allons créer un autre bouton appelé "Jump":
- Dupliquez l'objet "SprintButton" et renommez-le en "JumpButton"
- Remplacez la valeur "JumpButton" Pos Y par 250.
- Dans SC_ClickTracker, changez le nom du bouton en 'Jumping'
- Remplacez le texte à l'intérieur de "JumpButton" par 'Jump'
Et le dernier bouton est "Action":
- Dupliquez l'objet "JumpButton" et renommez-le en "ActionButton"
- Remplacez la valeur "ActionButton" Pos X par -185
- Dans SC_ClickTracker, remplacez le nom du bouton par 'Action'
- Remplacez le texte à l'intérieur de "ActionButton" par 'Action'
Étape 3: implémenter des contrôles mobiles
Si vous avez suivi les étapes ci-dessus, vous pouvez désormais utiliser ces fonctions pour implémenter les contrôles mobiles dans votre script:
if(SC_MobileControls.instance.GetMobileButtonDown("BUTTON_NAME")){
	//Mobile button has been pressed one time, equivalent to if(Input.GetKeyDown(KeyCode...))
}

if(SC_MobileControls.instance.GetMobileButton("BUTTON_NAME")){
	//Mobile button is being held pressed, equivalent to if(Input.GetKey(KeyCode...))
}

//Get normalized direction of a on-screen Joystick
//Could be compared to: new Vector2(Input.GetAxis("Horizontal"), Input.GetAxis("Vertical")) or new Vector2(Input.GetAxis("Mouse X"), Input.GetAxis("Mouse Y"))
Vector2 inputAxis = SC_MobileControls.instance.GetJoystick("JOYSTICK_NAME");
À titre d'exemple, je vais implémenter des contrôles mobiles avec un contrôleur FPS de ce tutoriel. Allez d'abord suivre ce tutoriel, c'est assez simple.
Si vous avez suivi ce didacticiel, vous auriez maintenant l'objet "FPSPlayer" ainsi que Canvas avec des contrôles mobiles.
Nous conserverons les contrôles du bureau tout en implémentant les contrôles mobiles, ce qui les rendra multiplateforme:
- Ouvrez le script SC_FPSController, faites défiler jusqu'à la ligne 28 et supprimez cette partie (la suppression de cette partie empêchera le verrouillage du curseur et permettra de cliquer sur les contrôles mobiles dans l'éditeur.):
        // Lock cursor
        Cursor.lockState = CursorLockMode.Locked;
Cursor.visible = false;- Faites défiler jusqu'à la ligne 39 et remplacez:
        bool isRunning = Input.GetKey(KeyCode.LeftShift);
        float curSpeedX = canMove ? (isRunning ? runningSpeed : walkingSpeed) * Input.GetAxis("Vertical") : 0;
float curSpeedY = canMove ? (isRunning ? runningSpeed : walkingSpeed) * Input.GetAxis("Horizontal") : 0;- Avec:
        bool isRunning = Input.GetKey(KeyCode.LeftShift) || SC_MobileControls.instance.GetMobileButton("Sprinting");
        float curSpeedX = canMove ? (isRunning ? runningSpeed : walkingSpeed) * (Input.GetAxis("Vertical") + SC_MobileControls.instance.GetJoystick("JoystickLeft").y) : 0;
float curSpeedY = canMove ? (isRunning ? runningSpeed : walkingSpeed) * (Input.GetAxis("Horizontal") + SC_MobileControls.instance.GetJoystick("JoystickLeft").x) : 0;- Faites défiler jusqu'à la ligne 45 et remplacez:
if (Input.GetButton("Jump") && canMove && characterController.isGrounded)- Avec:
if ((Input.GetButton("Jump") || SC_MobileControls.instance.GetMobileButtonDown("Jumping")) && canMove && characterController.isGrounded)- Faites défiler jusqu'à la ligne 68 et remplacez:
            rotationX += -Input.GetAxis("Mouse Y") * lookSpeed;
            rotationX = Mathf.Clamp(rotationX, -lookXLimit, lookXLimit);
            playerCamera.transform.localRotation = Quaternion.Euler(rotationX, 0, 0);
transform.rotation *= Quaternion.Euler(0, Input.GetAxis("Mouse X") * lookSpeed, 0);- Avec:
#if UNITY_IPHONE || UNITY_ANDROID || UNITY_EDITOR
            rotationX += -(SC_MobileControls.instance.GetJoystick("JoystickRight").y) * lookSpeed;
#else
            rotationX += -Input.GetAxis("Mouse Y") * lookSpeed;
#endif
            rotationX = Mathf.Clamp(rotationX, -lookXLimit, lookXLimit);
            playerCamera.transform.localRotation = Quaternion.Euler(rotationX, 0, 0);
#if UNITY_IPHONE || UNITY_ANDROID || UNITY_EDITOR
            transform.rotation *= Quaternion.Euler(0, SC_MobileControls.instance.GetJoystick("JoystickRight").x * lookSpeed, 0);
#else
            transform.rotation *= Quaternion.Euler(0, Input.GetAxis("Mouse X") * lookSpeed, 0);
#endif
Étant donné que le mouvement de l'apparence interférera avec les tests du joystick dans Editor, nous utilisons #if pour compilation spécifique à la plate-forme afin de séparer la logique mobile du reste des plates-formes.
Le Mobile FPS Controller est maintenant prêt, testons-le:
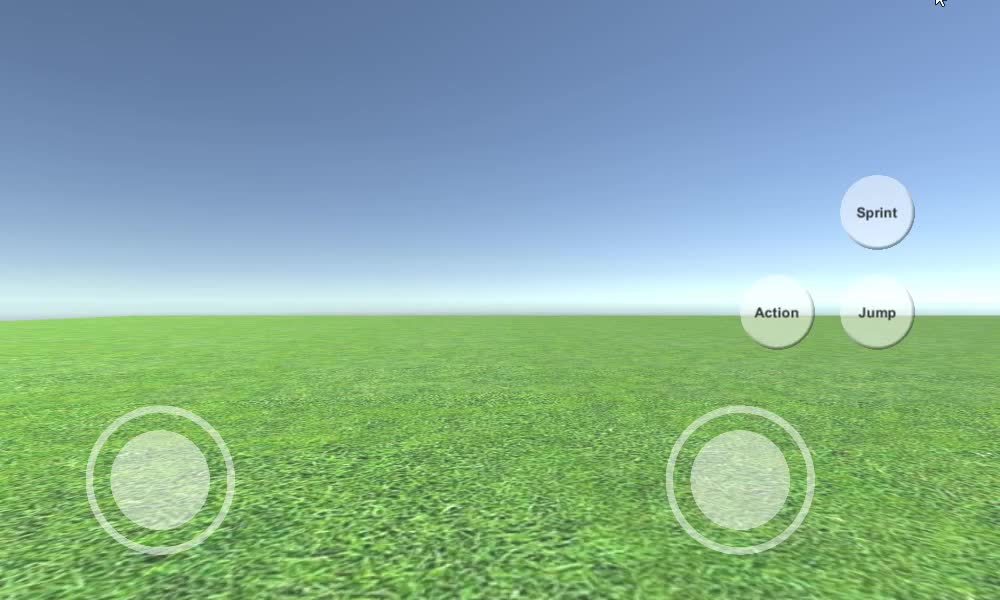
Comme vous pouvez le constater, tous les joysticks et boutons sont fonctionnels (à l'exception du bouton "Action", qui n'a pas été implémenté faute de fonctionnalité adaptée).